Showing posts with label beginning. Show all posts

Tuesday, June 5, 2018

Work surface completed!

Well it’s been awhile since I had any updates. But I bring good news!

I have finally had time to finish the “rudimentary” desk.
I had originally bought a solid core door on sale, thinking it would save me time to cut that down. But it had a paper wood veneer which I wasn’t happy about. After a lot of searching I decided to not waste anymore time and just make the damn thing.
I went to Home Depot bought two 3/4” x 4’ x 8’ sheets of cabinet grade ply. I had them rip the sheets into two 30” x 96”. Knowing I’d want my surface to be 28”-29” deep so I had some wiggle room knowing that them cutting wasn’t always accurate but also was easier to handle and saves me time at my work studio.
I just made sure to completely glue one surface and then clamp and weigh the other piece down on top.

6A7553F1-4624-4C67-A2F9-F4E4C4CB68E7.jpeg.0729e561d4b7294795a25a1152360de7.jpeg
Once the glue cured I cut the length down to 72” and proceeded to 400 grit sand the top and sides, followed 2x coat & sand with a final finish coat.
DE527132-0DF4-4AB2-A598-CEF22B37B3AE.jpeg.d25c54a0d8e5678b79cb0aa0fc24c7ce.jpegCF45D0DA-C208-4146-83F7-9469A49369B0.jpeg.79a801b4ff9d75b95b4fa3444989a954.jpeg0424018A-3B16-4147-B5C4-2A8B32A719DD.jpeg.862cdf5b09f0583238f09c0dd66fe6c4.jpeg
I used polycrylic over polyeurothane because it won’t yellow over time.
C2DE3655-D377-4B45-9852-46F1B9435B99.jpeg.ec2f4614905741465798f76b1d69b509.jpeg

Image result for ikea draper
I also made a trip to Ikea, I love this place!
The desk drawers are the “Alex” from Ikea. Unfortunately for those in the USA the Alex storage cabinet has been discontinued. Basically a cabinet with a door and single removable shelf and cord management, ideal for a desktop tower.. or in my case an airbrush compressor.
instead I went with the next best option, the filing cabinet drawer. Though I am not sure if I want to bore some holes in the back for the cord just yet until I get acclimated with the desk. I still have a long way to go for my setup to be done though.
The good news is that the Moppe finally back after many years! Cheap desktop hobby organizers!
73969CF0-22F1-47AA-A2C6-4A9469A7E615.jpeg.0faf0b181a3ca6d3566255c3bfbbef36.jpeg
oh they also had plenty of Slan!
CE0E3D26-AD2E-43D3-AD09-E1FF5708C019.jpeg.c265f08d7202dd12ae7357eecf32a5d4.jpeg
yeah bad joke but worth it.
I am still debating what lighting I want to go with, either doing an arch light or two of these:
D41CA082-0060-4D4D-9931-8CCE99813C4E.png.c3314c8d7c07d5fa9383e06b9e9293ac.png
I do have some models I’m putting together that I’ll get around to posting, but the desk has been crucial. Until next time, thanks for looking!

Sunday, May 20, 2018

Ready for a desk

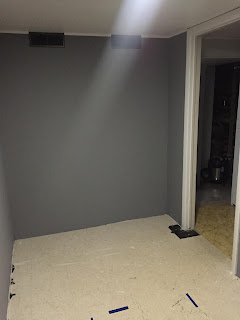
It has been awhile since I have last posted. So long in fact that the studio has been painted for awhile now! Here it is in all it's glory..


Why a grey room?
There are a ton of articles out there on it, but to sum it up: most painting studios are an 18% Flat Grey, or a grey green (mainly for portraiture life painting). The 18% grey is also used to balance photography levels prior to shooting. In this case the flat grey walls will help reduce light and color reflection. Ideally I would like a grey work surface for mini painting, but with cutting mats etc the surface is irrelevant. My walls are not 18% grey, as it would be much darker. Since the room is so little I didn't want to make it look any smaller with such dark walls, and this is close enough.

If anyone is wondering (note it is darker, light is right above this):
Hopefully I will be able to get my desk set up or at least figured out this week. I am leaning more and more towards a solid core door slab..

Tuesday, May 1, 2018

Gutted and Primed

Over the past several days I have managed to gut and prime the room. Painting the ceiling was probably the most tedious part since it's just porous ceiling tiles. While no one would ever notice it, I would always be reminded for not trying to get all the wholes and tile seams painted white when sitting in the room.


As you can see, the old stick down floor tile is nothing special. It's covered in old paint splatter and around the perimeter of the room the tile is busted (not really visible with painters tape down).  This was caused from pulling up the carpet tack strips. I am very thankful they didn't glue down the padding under the carpet to the floor like they did throughout most of the basement! The decision to leave the floor tile is 1) time 2) a larger project for full basement remodel another time and 3) safety, the house was built in 1965 and the mastic used for the tiles is probably cancerous. I have already popped off tile in my first apartment which I probably shouldn't have... I don't want another brush with that again. I also caulked around the floor because I didn't feel like this room needed baseboards, also its a basement and I don't want no creepy crawlers in my space!

Now to tape off the ceiling and trim to get ready for paint.

Friday, April 27, 2018

Floor Plan

I haven't been able to prep the room for paint, or fix the can light. However I took some time to put together various floor plans with some different desk options. I am not particularly in love with any of them. One thing for sure is that I wish some of these IKEA desks were a bit wider and deeper. It would seem that one table top variant is thinner but has more expansion options, where the deeper desk doesn't have any other longer or piece options.

Here are some floor plans for the small space, quite limiting but exciting nonetheless!

1                  &                   2
 3                 &                 4
I currently like 2 and 4.
While not a big deal, I am trying to keep access to the fuse box easy. Also this allows me to have a whole pin board wall for inspiration while I am working.

Once I decide on the floor plan, then I need to figure out if I want a white or black desk and shelves..

Hopefully I can get my walls rights and painted this weekend before moving onto buying my studio basics.


Tuesday, April 24, 2018

The Beginning

I have been in and out of this hobby many years, occasionally working on projects with spare time. I frequently lurk forums and blogs, always keeping in touch with my hobby side. To make a long story short, I have acquired a room in the basement that will become my 'studio'. While posts may be infrequent, I hope that in having a place set up will allow me to focus and keep working on things. This space is to keep me focused but also share what I am working on.

What better for an inaugural post, and subsequent ones, would be working on my new studio before diving into any painting or sculpting. Keep in mind that with many other house projects going on, including having a 9 month old, my studio is on the back burner. I will update with my progress as it happens.

Here is my future studio, a 6' x 11' window-less and door-less room. I am not sure where or why the door is not there but that is how it was when we bought the house. Not the best for airbrushing, but I'll figure out better ventilation later.


To start fresh my first steps are to:
  • Remove the ratty old carpet (I know there is old stick tiles from the 70s, but its not worth lifting them up at the moment)
  • Removed the 'built in' shelves
  • Replace the large inset '60s recessed light
  • Paint walls
Eventually I will make my way to IKEA and get some cheap desk and storage. While I am not messy person, (I don't spill or spray paint all over) the furniture is cheap enough to take some abuse without me worrying about it.
Once I get my desk set up I will be investigating new desk lighting, I am thinking Light Arches.
The hardwired lighting is a larger issue...